Rhinestone Transfer Guide
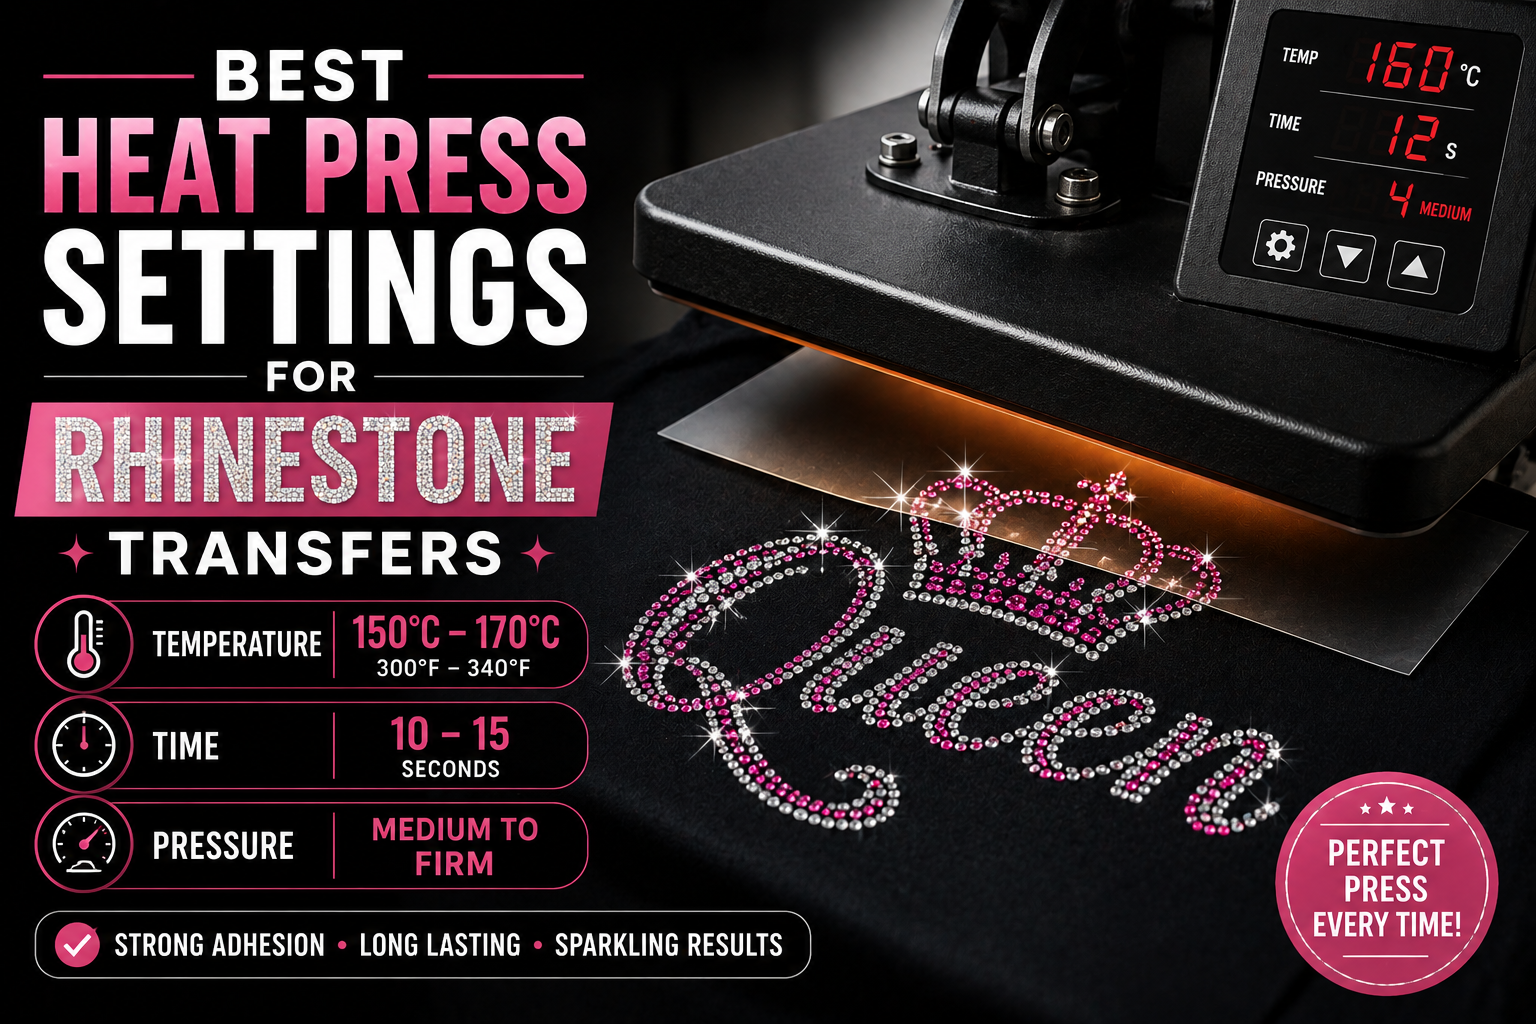
Best Heat Press Settings for Rhinestone Transfers
Using the right heat press settings is essential for creating durable, professional rhinestone transfers. Correct temperature, time, and pressure help the adhesive melt properly and bond the rhinestones securely to fabric.
Quick answer: Most rhinestone transfers work best at 150°C–170°C / 300°F–340°F for 10–15 seconds with medium to firm pressure. Always test first because fabric, stone size, and adhesive quality can affect the result.
Why Heat Press Settings Matter
Rhinestone transfers rely on heat-activated adhesive. When the correct heat and pressure are applied, the glue on the back of each rhinestone melts and bonds into the fabric surface.
If the temperature is too low, the adhesive may not activate fully. If the temperature is too high, the glue, fabric, or transfer film may be damaged. The goal is to find the right balance between heat, time, and pressure.
Recommended Heat Press Settings
| Setting | Recommended Range |
|---|---|
| Temperature | 150°C – 170°C / 300°F – 340°F |
| Time | 10 – 15 seconds |
| Pressure | Medium to firm pressure |
| Peel Method | Cool peel or warm peel depending on transfer film |
Pro tip: If stones lift after peeling, re-cover the design and press again for 5–8 seconds with firm pressure.
Step-by-Step Pressing Process
Step 1: Pre-Press the Garment
Place the garment on the heat press and press it for 3–5 seconds. This removes moisture, wrinkles, and uneven surface tension before applying the rhinestone transfer.
Step 2: Position the Transfer
Place the rhinestone transfer on the garment with the clear carrier sheet facing up. Make sure the design is aligned correctly before pressing.
Step 3: Cover with a Protective Sheet
Use a Teflon sheet or protective cover over the design. This helps protect the fabric, transfer film, and heat press surface.
Step 4: Apply Heat and Pressure
Press the design using the recommended temperature, time, and pressure. Heat activates the adhesive backing, while pressure helps the glue bond into the fabric fibers.
Step 5: Peel the Carrier Sheet
Allow the transfer to cool slightly if required, then peel the carrier sheet slowly. If any rhinestones lift, place the sheet back down and press again.
Step 6: Final Press
Cover the rhinestone design again and press for another 5–10 seconds. This helps secure the stones more firmly and improves wash durability.
Best Settings by Fabric Type
| Fabric Type | Suggested Setting | Notes |
|---|---|---|
| Cotton | 160°C–170°C / 320°F–340°F, 10–15 sec | Excellent for rhinestone transfers |
| Polyester | 150°C–160°C / 300°F–320°F, 10–12 sec | Use caution to avoid heat marks |
| Cotton-Poly Blend | 155°C–165°C / 310°F–330°F, 10–15 sec | Good balance of adhesion and safety |
| Denim / Canvas | 160°C–170°C / 320°F–340°F, 12–15 sec | May need stronger pressure |
| Stretch Fabric | 150°C–160°C / 300°F–320°F, 8–12 sec | Always test first to avoid damage |
What Happens If the Temperature Is Too Low?
If the temperature is too low, the adhesive backing may not fully melt. This creates weak bonding and can cause rhinestones to lift during peeling or fall off after washing.
- Rhinestones lift when peeling the film
- Design feels loose after pressing
- Stones fall off after washing
- Adhesive does not bond deeply into fabric
What Happens If the Temperature Is Too High?
Too much heat can damage the adhesive, fabric, or transfer film. Some fabrics may develop heat marks, shine marks, or color changes when overheated.
- Fabric may scorch or discolor
- Adhesive may become weak or over-melted
- Transfer film may warp
- Rhinestones may shift or lose clean alignment
How Much Pressure Should You Use?
Pressure is just as important as temperature. Medium to firm pressure helps the melted adhesive bond into the fabric surface. If pressure is too light, the rhinestones may not stick securely.
For thick fabrics such as denim, canvas, and hoodies, stronger pressure may be needed. For delicate or stretchy fabrics, test carefully to avoid marks or damage.
Important: If the stones are not sticking, do not only increase temperature. First check pressure, pressing time, and whether the garment was pre-pressed.
Common Heat Press Mistakes
- Skipping the test press: Different fabrics react differently to heat.
- Using low pressure: The glue may not bond properly.
- Peeling too early: Some transfers need cooling before peeling.
- No pre-press: Moisture can reduce adhesion.
- Skipping final press: This can reduce long-term durability.
How to Test Before Bulk Production
Before producing a full order, test one sample using your actual fabric and rhinestone transfer. After pressing, check stone adhesion, fabric condition, alignment, and washing performance.
- Press one small sample first
- Peel slowly and check if stones lift
- Stretch the fabric gently if applicable
- Wash test before bulk production
- Record the best settings for future orders
Good Pressing Result
Stones stay secure, fabric looks clean, carrier film peels smoothly, and the design remains shiny.
Poor Pressing Result
Stones lift, adhesive looks weak, fabric has heat marks, or the design shifts during pressing.
Final Thoughts
The best heat press settings for rhinestone transfers are usually 150°C–170°C / 300°F–340°F, 10–15 seconds, and medium to firm pressure. However, the ideal setting depends on your fabric, rhinestone quality, adhesive backing, and heat press machine.
For the best results, always pre-press the garment, test before bulk production, use proper pressure, peel carefully, and complete a final press. These steps help create a strong, durable, and professional rhinestone design.
Need High-Quality Rhinestone Transfers?
Teebling provides custom rhinestone transfers with strong adhesion, premium sparkle, fast sampling, and reliable production support for apparel brands and businesses.
Get a Quote