Crystal Cap Rhinestone Placement Guide
Plan rhinestone placement on a cap using crown geometry, seams, brim clearance, equipment access, and a worn-sample review.
Buyer perspective
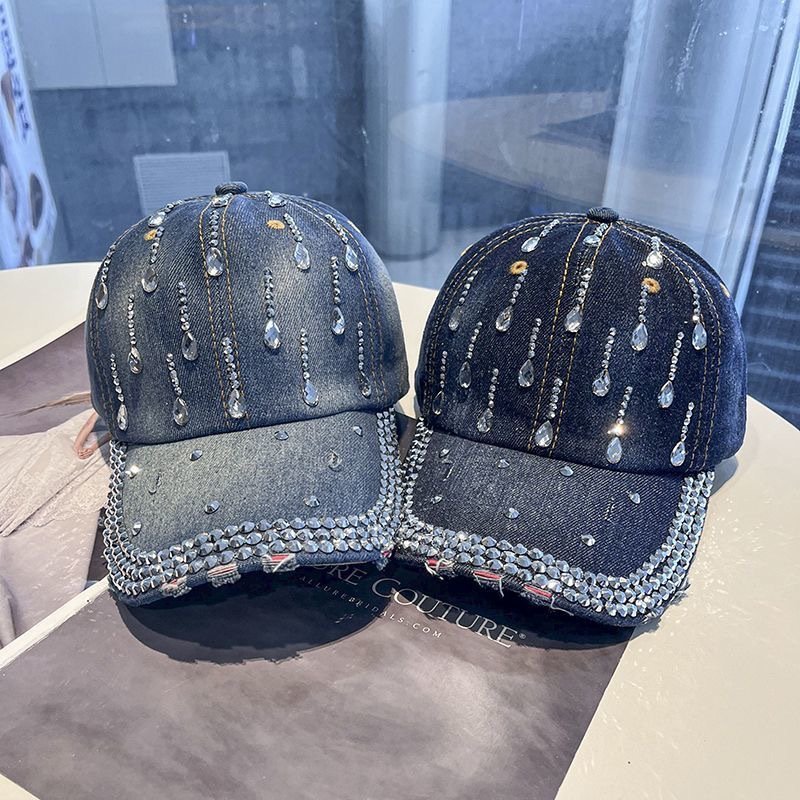
A cap is not a flat transfer panel. Crown curvature, center seams, brim attachment, and internal support affect what can be placed and applied. Work from the actual cap body, not a front-only mockup of a generic silhouette.
Specification
Map the cap panel in three views
A cap front is curved and often interrupted by a center seam. Measure the available area on the chosen cap, then review the artwork from front, side, and worn views before fixing the crystal layout.
- Front boundary
- Mark the usable width and height between seams, eyelets, and brim junction on the real crown.
- Side distortion
- Check whether letters or stones near the panel edge disappear from a side view.
- Application reach
- Confirm that the intended process can contact the entire design on the curved surface.
Approve a decorated cap, not a flat transfer sheet, before repeating the placement across an order.
What to decide
Build a brief that can be tested
01Map a usable field
Mark the crown's centerline, seam positions, brim transition, and the area that can be supported by the intended decoration equipment. Measure the visible front from a worn viewpoint. A motif can be technically centered yet look low once the cap is worn.
02Choose a readable motif
Keep important letters and tiny isolated stones away from strong seams and abrupt curves. Test the graphic at physical size on the cap. A smaller, cleaner icon may hold its shape better than a wide word across several crown panels. Compare a compact transfer, individually applied stones or a constructed patch only where the chosen cap and proposed process support that route. Request the completed cap, not just a flat motif sheet, for the method decision.
03Inspect the worn cap
Approve a decorated sample from front and side angles, then handle it normally by the brim and crown. Check raised edges, stones near high-contact areas, and visual balance. Keep the cap model with the placement record. Use current application instructions for the exact cap and inspect the cooled crown for shape change as well as stone alignment. Tie the placement diagram to the cap model and size; a universal distance from the brim is not an approval.
Bring to the inquiry
- Exact cap body and front-panel dimensions
- Seam and brim map
- Motif size and stone color
- Applied and worn sample
Request a Bulk Quote
Send your artwork, quantity, destination, and specifications for a tailored quote.
FAQ
Common questions
What should I check about map the cap panel in three views when using Crystal Cap Rhinestone Placement Guide?
A cap front is curved and often interrupted by a center seam. Measure the available area on the chosen cap, then review the artwork from front, side, and worn views before fixing the crystal layout.
What should I check about application reach when using Crystal Cap Rhinestone Placement Guide?
Approve a decorated cap, not a flat transfer sheet, before repeating the placement across an order.
Which approval decision should a Crystal Cap Rhinestone Placement Guide quote record?
If the chosen cap offers too little supported area, change the motif or cap body before approving production. A flat transfer proof cannot validate cap placement alone.
What front boundary is recorded for Crystal Cap Rhinestone Placement Guide?
The Crystal Cap Rhinestone Placement Guide reference gives its front boundary as “Mark the usable width and height between seams, eyelets, and brim junction on the real crown.”. Use this item-specific entry when identifying your requested version and distinguish it from any changes to the Crystal Cap Rhinestone Placement Guide production brief.
What side distortion is recorded for Crystal Cap Rhinestone Placement Guide?
The Crystal Cap Rhinestone Placement Guide reference gives its side distortion as “Check whether letters or stones near the panel edge disappear from a side view.”. Use this item-specific entry when identifying your requested version and distinguish it from any changes to the Crystal Cap Rhinestone Placement Guide production brief.
What application reach is recorded for Crystal Cap Rhinestone Placement Guide?
The Crystal Cap Rhinestone Placement Guide reference gives its application reach as “Confirm that the intended process can contact the entire design on the curved surface.”. Use this item-specific entry when identifying your requested version and distinguish it from any changes to the Crystal Cap Rhinestone Placement Guide production brief.
What does the Crystal Cap Rhinestone Placement Guide B2B brief help a wholesale buyer decide?
Plan rhinestone placement on a cap using crown geometry, seams, brim clearance, equipment access, and a worn-sample review.
What should I check about map a usable field when using the Crystal Cap Rhinestone Placement Guide B2B brief?
The Crystal Cap Rhinestone Placement Guide B2B brief guidance notes: Mark the crown's centerline, seam positions, brim transition, and the area that can be supported by the intended decoration equipment.
How should buyers choose a readable motif for the Crystal Cap Rhinestone Placement Guide B2B brief?
The Crystal Cap Rhinestone Placement Guide B2B brief guidance notes: Keep important letters and tiny isolated stones away from strong seams and abrupt curves.
How should buyers inspect the worn cap for the Crystal Cap Rhinestone Placement Guide B2B brief?
The Crystal Cap Rhinestone Placement Guide B2B brief guidance notes: Approve a decorated sample from front and side angles, then handle it normally by the brim and crown.